Building a Personalized Face Mask Detection Using OpenCV and Deep Learning
A hands-on guide to understand how to build a mask detection with personalized outputs
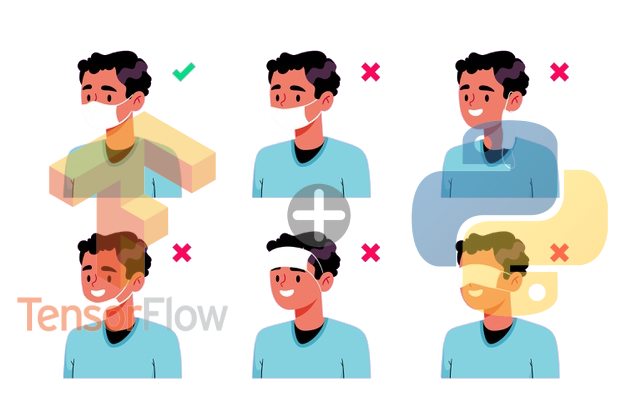
Face masks have become a vital element of our daily lives during the current global pandemic (COVID-19). So, wearing them is important for safety and to control the spread. These Masks are capable of stopping the spread of this deadly virus, which will help to control the spread. As we have started moving forward in this ‘new normal’ world, the necessity of the face mask has increased. By these means, it is necessary that in addition to using the masks, people use them correctly, always covering the mouth and nose.
In this article, unlike other works, our main focus is to detect whether a person is wearing correctly a mask or not.
There are some steps to achieve our goal: First we need to build a dataset, then we need to perform our classifier model based on deep learning and detect human faces using OpenCV and finally we create a real time solution do predict if a person is using correctly a mask or not.
Step 1 : Dataset
The dataset used in this experiment was composed by images that we found online in published datasets:
The use of several datasets was necessary to collect different scenarios:
- People of different racial and ethnicities
- Masks of different types
- Masks in different positions
- Different Angles
Examples
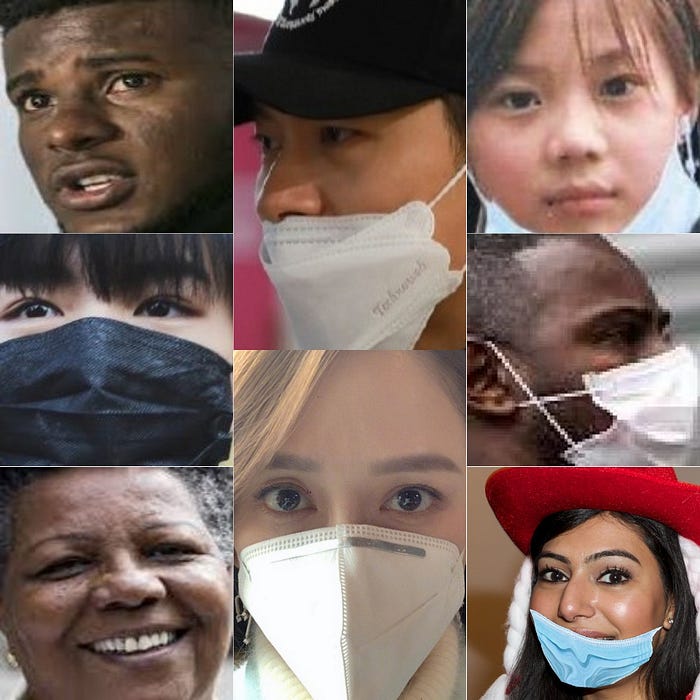
{0: ‘maskchin’, 1: ‘maskmouth’, 2: ‘maskoff’, 3: ‘maskon’}Final Dataset Link
The complete dataset are available in Google Drive (25.6GB).
Step 2 : Perform Deep Learning Architecture
In this task, I used MobileNet, a class of light weight deep convolutional neural networks that are vastly smaller in size and faster in performance than many other popular models, in order to classify if a person are using a mask or not. I worked with MobileNet implemented in TensorFlow’s Keras API.
from keras.applications.mobilenet import MobileNet
...# Params
IMAGE_WIDTH = 300
IMAGE_HEIGHT = 300
IMAGE_SIZE = (IMAGE_WIDTH, IMAGE_HEIGHT)
IMAGE_CHANNELS = 1
IMG_DIR = 'images/'
BATCH_SIZE = 32
NUM_CLASSES = 4
# Model
base_model = MobileNet(
    weights= None,
    include_top=False,
    input_shape= (IMAGE_HEIGHT, IMAGE_WIDTH, IMAGE_CHANNELS)
)x = base_model.output
x = GlobalAveragePooling2D()(x)
x = Dense(256,activation='relu')(x)
x = Dropout(0.2)(x)predictions = Dense(NUM_CLASSES, activation='softmax')(x)
model = Model(inputs=base_model.input, outputs=predictions)opt = Adam(lr=0.000125)model.compile(loss='categorical_crossentropy', optimizer'adam', metrics=['accuracy'])
Callbacks
callbacks_list = [
    ModelCheckpoint(
        '../weights/service_weights.h5', monitor='val_accuracy',            verbose=1, save_best_only=True, mode='max'),
    EarlyStopping(monitor='val_accuracy', patience=5),
    ReduceLROnPlateau(monitor='val_accuracy', patience=3, verbose=1, factor=0.5, min_lr=0.00001)
]
Generators
def add_noise(img):
    '''Add random noise to an image'''
    VARIABILITY = 8
    deviation = VARIABILITY*random.random()
    noise = np.random.normal(0, deviation, img.shape)
    img += noise
    np.clip(img, 0., 255.)    return imgtrain_datagen = ImageDataGenerator(
    brightness_range=[0.2, 1.6],
    rescale=1. / 255,
    rotation_range=0,
    width_shift_range=0.1,
    height_shift_range=0.1,
    shear_range=0.2,
    zoom_range=0.2,
    horizontal_flip=True,
    fill_mode="nearest",
    preprocessing_function=add_noise,
)train_generator = train_datagen.flow_from_dataframe(
    train_df,
    IMG_DIR,
    x_col='filename',
    y_col='category',
    target_size=IMAGE_SIZE,
    color_mode = 'grayscale',
    class_mode='categorical',
    batch_size=BATCH_SIZE
)
validation_datagen = ImageDataGenerator(rescale=1./255)validation_generator = validation_datagen.flow_from_dataframe(
    validate_df,
    IMG_DIR,
    x_col='filename',
    y_col='category',
    target_size=IMAGE_SIZE,
    color_mode = 'grayscale',
    class_mode='categorical',
    shuffle=False,
    batch_size=BATCH_SIZE
)
Fit Model
epochs=50 if FAST_RUN else 50history = model.fit_generator(
    train_generator,
    epochs=epochs,
    validation_data=validation_generator,
    validation_steps=total_validate//BATCH_SIZE,
    steps_per_epoch=total_train//BATCH_SIZE,
    callbacks=callbacks_list
)
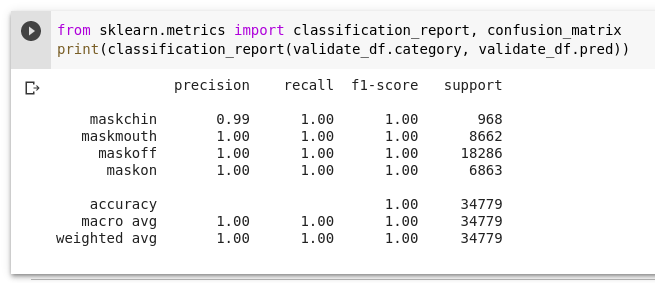
Classification Report Results
Step 3 : OpenCV Face Detection Strategy
In order to find faces in a frame/image and then identify if the person is wearing a mask or not, I used CascadeClassifier, already included in the OpenCV library. In general, this training method uses an .xml file, which is also already included in the package, to train a model that recognizes faces in a generic way, using the Viola-Jones and AdaBoost method to improve performance.
import cv2filename = "haarcascade_frontalface_alt2.xml"# Load face recognition template
classifier = cv2.CascadeClassifier(f'{cv2.haarcascades}/{filename}')# Detecting faces in the image
faces = classifier.detectMultiScale(image)
The only problem with this method is that it only recognizes front faces in the 3x4 photo style.
Step 4 : Predicting in Real Time
import silence_tensorflow.auto
from tensorflow.python.keras.models import load_model
from tensorflow.compat.v1 import InteractiveSession
from tensorflow.compat.v1 import ConfigProto
import numpy as np
import cv2config = ConfigProto()
config.gpu_options.allow_growth = True
session = InteractiveSession(config=config)keras_model = load_model('model.h5')
cam = cv2.VideoCapture(0)
file_name = "haarcascade_frontalface_alt2.xml"
classifier = cv2.CascadeClassifier(f"{cv2.haarcascades}/{file_name}")label = {
    0: {"name": "Mask only in the chin", "color": (51, 153, 255), "id": 0},
    1: {"name": "Mask below the nose", "color": (255, 255, 0), "id": 1},
    2: {"name": "Without mask", "color": (0,0,255), "id": 2},
    3: {"name": "With mask ok", "color": (0, 102, 51), "id": 3},
}while True:
    status, frame = cam.read()    if not status:
        break    if cv2.waitKey(1) & 0xff == ord('q'):
        break

    gray = cv2.cvtColor(frame, cv2.COLOR_BGR2GRAY)
    faces = classifier.detectMultiScale(gray)    for x,y,w,h in faces:
        color = (0,0,0)
        gray_face = gray[y:y+h+50, x:x+w+50]        if gray_face.shape[0] >= 200 and gray_face.shape[1] >= 200:            gray_face = cv2.resize(gray_face, (300, 300))
            gray_face = gray_face / 255
            gray_face = np.expand_dims(gray_face, axis=0)
            gray_face = gray_face.reshape((1, 300, 300, 1))
            pred = np.argmax(keras_model.predict(gray_face))
            classification = label[pred]["name"]
            color = label[pred]["color"]            cv2.rectangle(frame, (x,y), (x+w, y+h), color, label[pred]["id"])            cv2.putText(frame, classification, (x, y + 20), cv2.FONT_HERSHEY_SIMPLEX, 0.5, color, 2, cv2.LINE_AA)
            cv2.putText(frame, f"{len(faces)} detected face",(20,20), cv2.FONT_HERSHEY_SIMPLEX, 0.5, (255,0,0), 2, cv2.LINE_AA)    cv2.imshow("Cam", frame)
Result
In this step, we will unify everything that was previously done in a script so that we can view the results in real time.
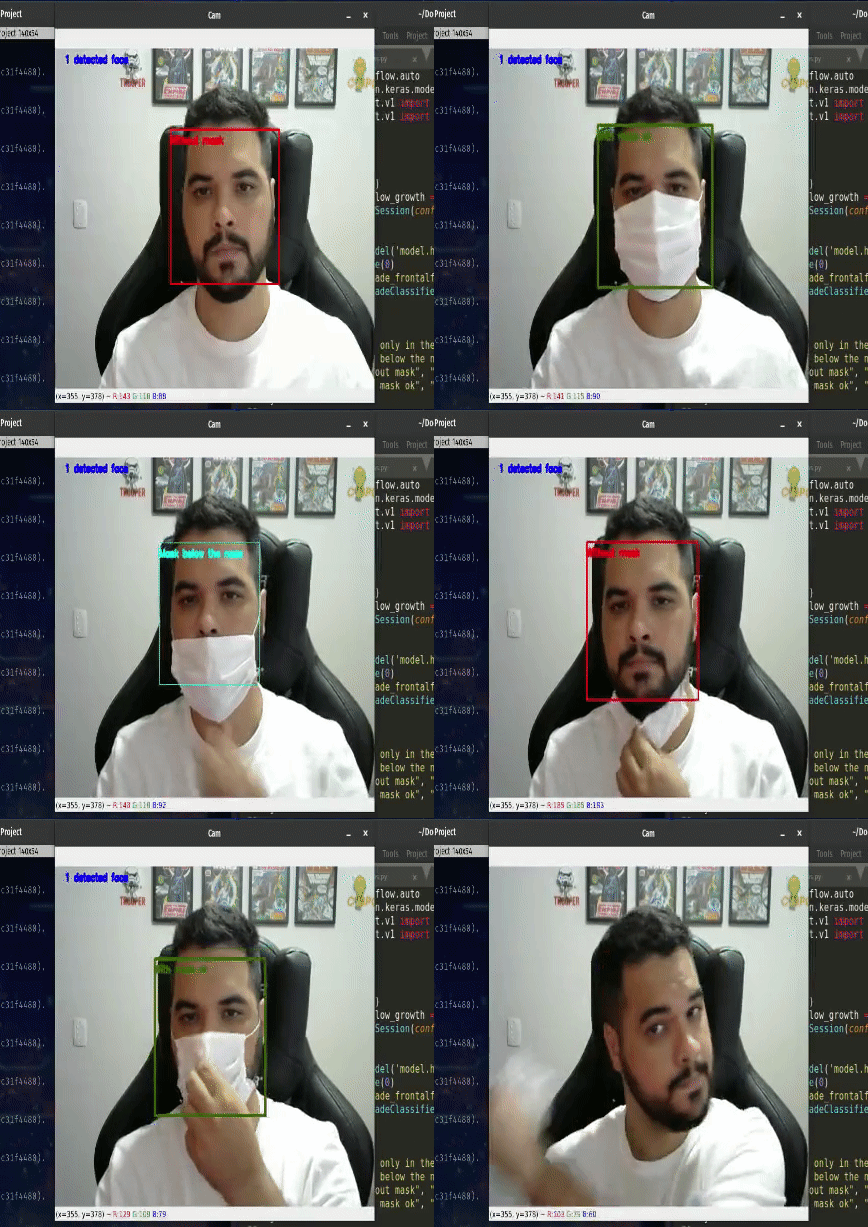
🏷️ Labels
- Mask only in the chin [RGB Color: Neon Carrot]
- Mask below the nose [RGB Color: Aqua]
- Without mask [RGB Color: Red]
- With mask ok [RGB Color: Green]
Final Remark
We have developed a model that can identify whether a person has worn a mask or not. In addition, our model is able to identify whether a person is wearing the mask in the wrong way, either by not covering the nose or leaving the mask only on the chin. These types of models can be implemented in public places that would help the authorities to monitor the situation easily.
I hope this experiment help you in your studies or work. See you soon!
Useful links
- Repository that motivated this experiment:
- The code are available in my Github:
- Dataset
